Microsoft Office Connector
ImageQuest provides an add-in for several Microsoft Office programs which allows for sending and in some cases opening documents from ImageQuest. The following Microsoft applications are supported:
- Microsoft Word 2003 – 2016, 365
- Microsoft Excel 2003 - 2016, 365
- Microsoft Outlook 2003 – 2016, 365
Other Microsoft file types can to be sent to IQ using the Windows Explorer Connector; see the previous section for more information.
The Microsoft Office Connector installs a new tab called “IQ” in Microsoft Word and Microsoft Excel. Under the ImageQuest tab are two commands, one for saving files to IQ and one for opening files from IQ.
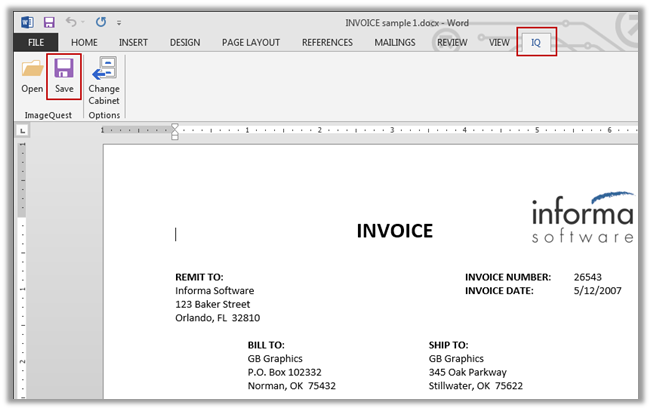
For example, create a Microsoft Word document that you wish to save in IQ as displayed below. Click the IQ tab to see the available commands in the ribbon and click “Save to ImageQuest”.
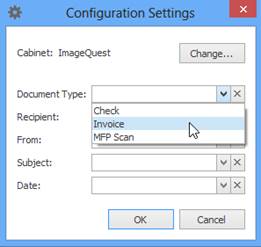
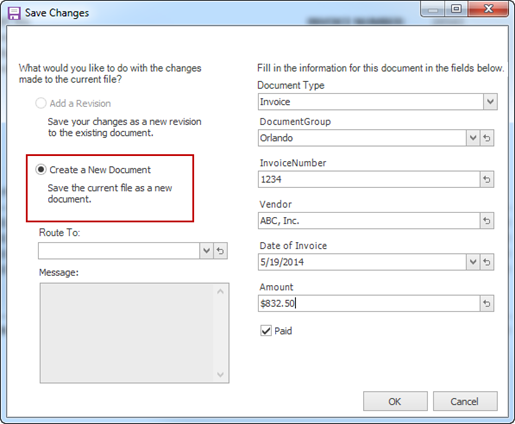
The “Save Changes” window appears allowing the user to “Add a Revision” or “Create a New Document” as demonstrated below. Since this is a new document, adding a revision to an existing document is not possible so the option is disabled. Select the Document Type and assign attributes; click “OK” when finished. The file is now saved to IQ and is searchable from IQdesktop using the index information.
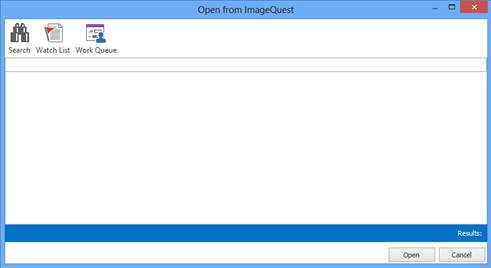
Now that the document is stored in IQ, it may be retrieved using IQdesktop or by using the Open from ImageQuest command under the IQ tab. Clicking the Open from ImageQuest button brings up a new window allowing you to search for documents as well as access your Watch List and Work Queue. See the following page for an example.
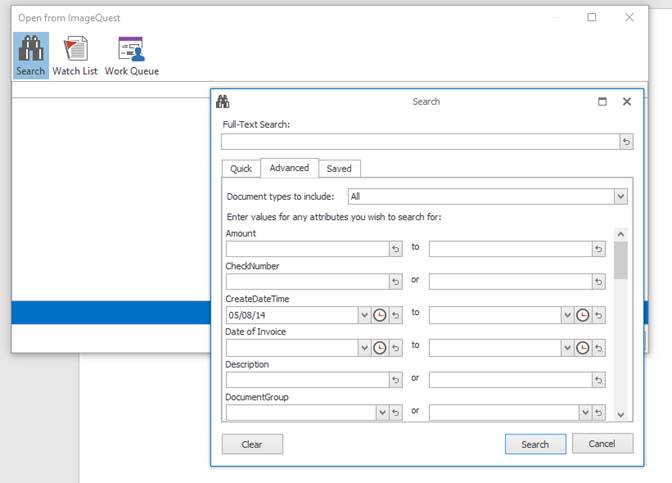
To find the document saved earlier, click on the “Search” icon and enter the appropriate attributes and click the “Search” button. See below.
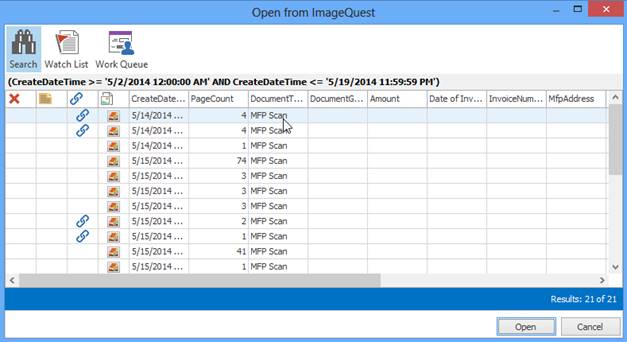
The search results will be displayed in the grid. Double-click on the record or highlight the record or click the “Open” button to open the document.
If we now make additional changes to this document and click the Save to ImageQuest button, the “Add a Revision” is now enabled. The index information will be automatically populated and may be changed if necessary. Click “OK” to send this revised document to IQ.
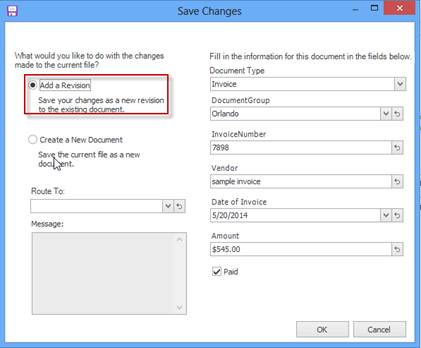
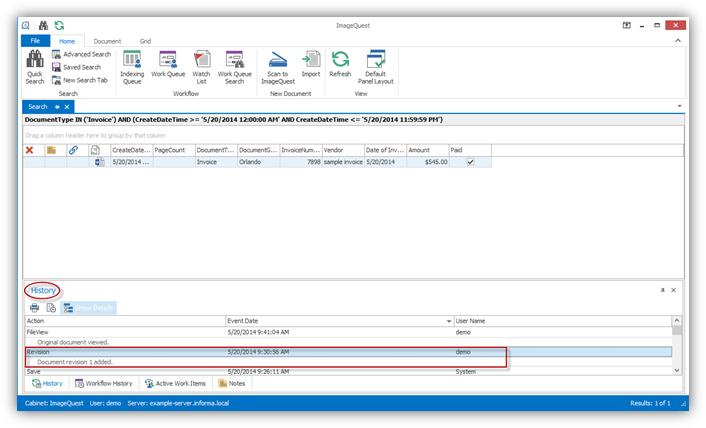
When a document is revised, the Document Type and all associated attributes on the “Save Changes” screen will replace the existing document metadata. Any previous versions of the document can still be accessed from the History panel in IQdesktop by highlighting the “Revision” action and clicking on the “View Revision” button as shown below.
Microsoft Word and Excel 2003 function the same as the 2013 and 2016 versions; however, the icons are located in the ImageQuest toolbar. See examples below.
![]()
![]()
Note: Only the most recent document revision can be opened directly from Microsoft Word or Excel.
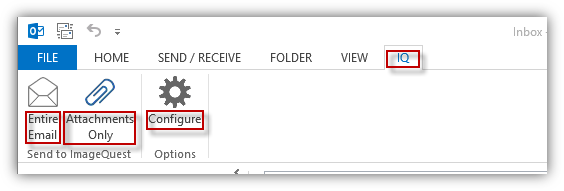
The Microsoft Office Connector for Microsoft Outlook 2013 differs from the Microsoft Word and Excel Connectors in that it allows the user to save emails and/or attachments into IQ and there is no option to open from IQ. Once again, the IQ ribbon tab is available with two options available when sending to ImageQuest:
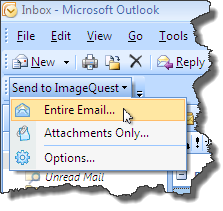
The Microsoft Office Connector for older versions of Microsoft Outlook installs a new toolbar with one button called “Send to ImageQuest”. This button has two send options, “Entire Email…” and “Attachments Only…” as well.
To store an email message in IQ, open Microsoft Office Outlook and locate the Send to ImageQuest ribbon group button in the “IQ” ribbon tab as shown below:
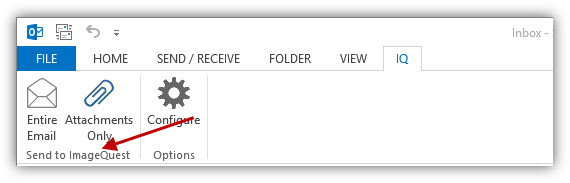
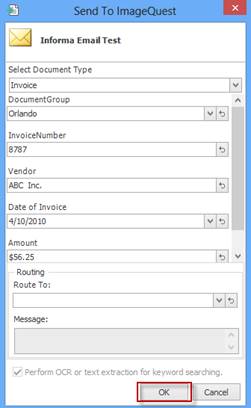
To send the entire email to IQ, highlight the email in Microsoft Outlook, under the Send to ImageQuest group click “Entire Email”. The Send to ImageQuest window appears allowing the user to select a Document Type and fill in the associated attributes as demonstrated on the following page. Click the “OK” button when finished.
A message box will appear saying that the file was saved successfully to IQ. The email message is now searchable from IQdesktop.
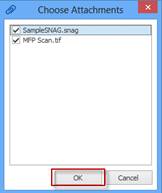
To send one or more attachments without the main message body, follow the same steps, but this time click on “Attachments Only” button from the “IQ” ribbon tab.
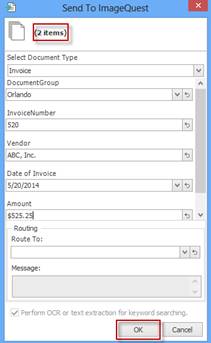
The “Choose Attachments” window appears allowing the user to select which attachments get stored in IQ as modeled below; click “OK”. In the example below, three file attachments will be selected to send to IQ. All three attachments will receive the same index information.
The Send to ImageQuest window appears allowing the user to select a document type and fill in the associated attributes as seen below. Click the “OK” button when finished. A message box will appear saying that the files were saved successfully to IQ. These attachments are now searchable from IQdesktop.
Note: Users must have the “Add Document” permission to send new documents and the “Update Document” permission in order to add a revision to an existing record in ImageQuest using the Microsoft Window Office Connector.
The “Options” feature for Outlook allows the user to pre-define a Document Type and map certain message fields to ImageQuest attributes. Once configured, the values from the fields will populate the associated attribute in ImageQuest.